1. Dark/Light 테마란?
다크 테마(Dark Theme)는 최근 웹 사이트에서 거의 필수적으로 넣는 기능이 되었습니다.
어두운 환경에서 눈의 피로를 줄이기 위해 선호합니다. 또한, 모바일 환경에서 배터리 소모를 줄이는 데에도 도움이 되는 장점이 있습니다.
라이트 테마(Light Mode)는 반대로 밝은 환경에서 더 나은 가독성을 제공합니다.
2. Next.js에서 Dark/Light 테마 기능
2.1. Tailwind CSS 설정
Next.js 14에서는 tailwindcss를 v3을 사용합니다. 따라서, 다음 코드와 같이 tailwind.config.js 파일에 darkMode를 설정해주어야 합니다.
// tailwind.config.js
module.exports = {
  darkMode: 'class', // 'media' 대신 'class'를 사용
  content: ['./pages/**/*.{js,ts,jsx,tsx}', './components/**/*.{js,ts,jsx,tsx}'],
  theme: {
    extend: {},
  },
  plugins: [],
}만약, Next.js 15를 사용한다면 tailwindcss를 v4 버전을 사용하기 때문에, tailwind.config.js 파일로 설정하는 것이 아니라, 다음 코드와 같이 CSS 파일에서 직접 설정해주어야 합니다.
/* app/global.css */
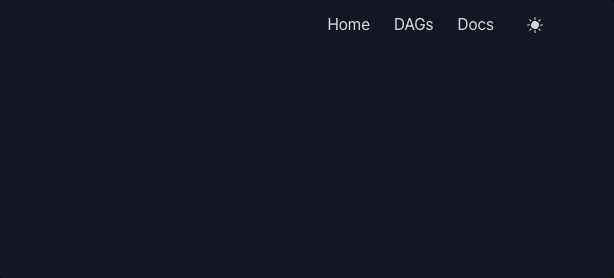
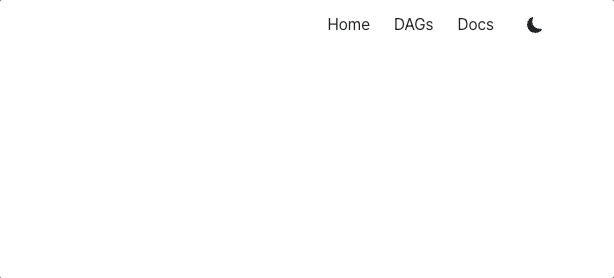
@custom-variant dark (&:where(.dark, .dark *));위 설정이 끝나면 html 태그에 dark 클래스를 추가하면 다크 모드로 전환이 되고, dark 클래스가 없으면 기본 light 모드로 전환됩니다.
2.2. Dark/Light 테마 토글 기능 구현
2.2.1. 테마 기능 구현시 Next.js에서 고려해야할 점
React 환경에서 만든다고 하면, 화면에 컴포넌트가 그려지기 전에 dark 클래스를 추가해야 화면 깜빡임(flickering) 현상이 발생하지 않습니다. 그래서 useLayoutEffect와 같은 훅(hook)을 사용하면 좋습니다.
하지만, Next.js에서는 SSR 특성상 useLayoutEffect나 useEffect는 서버 렌더링 시점에는 실행되지 않고, 무시됩니다. (CSR 시점에 실행됨)
따라서, 이미 서버에서 렌더링이 된 이후에 클라이언트에서 dark 클래스를 추가하게 되므로, 화면 깜빡임(flickering) 현상이 발생하게 됩니다.
또한, 서버 입장에서는 사용자의 media 쿼리(prefers-color-scheme)를 알 수 없고, localStorage 또한 접근이 불가능합니다. 서버 렌더링시에는 사용자의 테마가 무엇인지도 알 수 업습니다.
2.2.2. 쿠키를 활용하여 구현하기
따라서, Next.js에서 화면 깜빡임 없이 Dark/Light 테마를 구현하기 위해서는 쿠키를 사용해야 합니다. 쿠키는 서버와 클라이언트 모두 접근할 수 있고, 서버 렌더링 시점에서도 클라이언트로 부터 받은 쿠키로 사용자의 테마를 알 수 있습니다.
우선, 클라이언트에서 시스템 테마를 읽어와서 html의 class를 설정하는 코드부터 작성합니다. 화면 깜빡임 현상을 방지하기 위해, <script> 태그에 dangerouslySetInnerHTML를 사용하여 클라이언트에서 dark 클래스를 추가하는 코드를 작성합니다.
<script
    dangerouslySetInnerHTML={{
      __html: `
(function() {
  const systemPrefersDark = window.matchMedia('(prefers-color-scheme: dark)').matches;
  const themeValue = systemPrefersDark ? 'dark' : 'light';
  if (themeValue === 'dark') {
    document.documentElement.classList.add('dark');
  } else {
    document.documentElement.classList.remove('dark');
  }
})();`,
    }}
/>그 다음은 테마를 변경해주는 버튼(ThemeToggleButton) 컴포넌트를 생성 합니다. html 태그에 dark 클래스 유무에 따라 state 값을 변경하는 코드를 작성합니다.
// ThemeToggleButton.tsx
export default function ThemeToggleButton() {
  const [theme, setTheme] = useState<'light' | 'dark'>('light');

  useLayoutEffect(() => {
    const isDark = document.documentElement.classList.contains('dark');
    setTheme(isDark ? 'dark' : 'light');
  }, []);
}이후, 테마 버튼과 토글 기능을 구현합니다. 여기서 버튼을 눌렀으때 다음 3개의 값을 변경해줘야 합니다.
- state 값 변경: 현재 테마 상태를 변경하여 리렌더링을 수행하기 위함
- 쿠키 값 변경: 서버 렌더링시에 사용자의 테마를 미리 렌더링하기 위함 (화면 깜빡임 현상 방지)
- html 태그의 class 변경: tailwind에서 다크 모드를 제어허기 위함
// ThemeToggleButton.tsx
'use client';

import { useLayoutEffect, useState } from 'react';
import SunIcon from './SunIcon';
import MoonIcon from './MoonIcon';

export default function ThemeToggleButton() {
  const [theme, setTheme] = useState<'light' | 'dark'>('light');

  useLayoutEffect(() => {
    const isDark = document.documentElement.classList.contains('dark');
    setTheme(isDark ? 'dark' : 'light');
  }, []);

  const setThemeValue = (nextTheme: 'light' | 'dark') => {
    document.documentElement.classList.toggle('dark', nextTheme === 'dark');
    document.cookie = `theme=${nextTheme}; path=/; max-age=31536000`;
    setTheme(nextTheme);
  };

  const toggleTheme = () => {
    setThemeValue(theme === 'dark' ? 'light' : 'dark');
  };

  return (
    <button
      className="flex items-center justify-center w-[34px] h-[34px] rounded transition duration-150 ease-in-out cursor-pointer hover:bg-app-sub-bg dark:hover:bg-app-dark-sub-bg"
      onClick={toggleTheme}
    >
      {theme === 'dark' ? <SunIcon /> : <MoonIcon />}
    </button>
  );
}마지막으로, 서버 사이드에서 클라이언트로부터 쿠키 값을 읽어와서 렌더링을 해줘야 합니다. Next.js에서는 next/headers를 사용하여 쿠키를 읽어올 수 있습니다.
// app/layout.tsx
import { cookies } from 'next/headers';

export default async function RootLayout({
  children,
}: Readonly<{
  children: React.ReactNode;
}>) {
  const cookieStore = await cookies();
  const theme = cookieStore.get('theme')?.value;
  const isNotSettingTheme = theme === undefined || theme === null;
  const isDarkTheme = theme === 'dark';

  return (
    <html
      lang="ko"
      className={isNotSettingTheme ? '' : `${isDarkTheme ? 'dark' : ''}`}
    >
      <body className="antialiased">
        {isNotSettingTheme && (
          <script
            dangerouslySetInnerHTML={{
              __html: `
(function() {
  const systemPrefersDark = window.matchMedia('(prefers-color-scheme: dark)').matches;
  const themeValue = systemPrefersDark ? 'dark' : 'light';
  if (themeValue === 'dark') {
    document.documentElement.classList.add('dark');
  } else {
    document.documentElement.classList.remove('dark');
  }
})();`,
            }}
          />
        )}
        {children}
      </body>
    </html>
  );
}
app/layout.tsx에서 쿠키를 읽어옵니다.
만약, dark 또는 light 값이 아니라면 최초 방문하여 쿠키 값이 없는 상태이므로 처음에 추가했던 <script dangerouslySetInnerHTML ... /> 스크립트가 수행되어야 하기 때문에 다음과 같이 작성합니다.
{isNotSettingTheme && (
  <script
    dangerouslySetInnerHTML={{
      __html: `...`
    }}
  />
)}쿠키의 theme 값이 dark 라면 html 태그에 dark 클래스를 추가합니다. 만약, light 라면 dark 클래스를 제거합니다.
이제 앱을 실행하여 확인해보면 정상적으로 테마가 변경됩니다.
2.3. 서버 렌더링과 클라이언트 렌더링 불일치 문제
이때 시스템 테마가 다크 모드이고, 최초 접속시에 다음과 같은 오류가 발생합니다.
Hydration failed because the server rendered HTML didn't match the client. As a result this tree will be regenerated on the client. This can happen if a SSR-ed Client Component used:이 에러는 Next.js에서 서버 렌더링과 클라이언트 렌더링의 결과가 일치하지 않을 때 발생합니다. 시스템 테마가 다크모드이고, 최초 렌더링시에는 서버 렌더링에서는 light 모드로 인지하게되고, 클라이언트 렌더링 시에는 dark 모드로 인지하게 됩니다.
// 서버 렌더링
<html className="">// 클라이언트 렌더링
<html className="dark">화면 깜빡임을 없애기 위해서는, 위 경우는 필수적으로 발생할 수 밖에 없습니다. html에 suppressHydrationWarning를 넣어 해당 Hydration 문제가 발생하지 않도록 무시하는 설정을 추가합니다.
<html
  lang="ko"
  className={isNotSettingTheme ? '' : `${isDarkTheme ? 'dark' : ''}`}
  suppressHydrationWarning
>